HOW TO INSTALL
How to install an eSIM — before you begin
Check compatibility
STEP 01
Check that your device has an Add eSIM option to confirm eSIM support. You can look in Settings or use the compatibility link below.
Confirm it is unlocked
STEP 02
Make sure your device is carrier-unlocked. If it was purchased with a carrier contract, contact that carrier to confirm or request an unlock.
Prepare your QR code
STEP 03
Print the QR code or display it on another device, such as a tablet, another phone, or a computer, so your travel phone can scan it.
Connect to stable internet
STEP 04
When adding the eSIM plan, ensure the phone used for scanning has a stable internet connection. Wi-Fi is recommended.
Scan only once
STEP 05
Scan the code with the phone you will actually use for mobile data during your trip. Your unique QR code can be scanned only once and cannot be transferred.
Do not delete the eSIM
STEP 06
After installation, do not delete the eSIM from your phone. Once deleted, it cannot be used again or restored by rescanning the QR code.
Checks before using an eSIM
Before you begin
Confirm that your device supports eSIM
iPhone XS, XR or newer models generally support eSIM. Some iPhone 13 models support dual eSIM.
Mainland China models generally do not support eSIM; some Hong Kong and Macao models do.
Make sure your iPhone is carrier-unlocked
Confirm that your phone is Sim-Lock Free (carrier-unlocked). If it was purchased with a carrier contract, contact the carrier to confirm its unlock status.
Ensure a stable internet connection
When scanning the QR code to install your eSIM, the phone must be connected to Wi-Fi or mobile data to verify and download the plan.
How do I install and activate an eSIM on iPhone?
[ IOS ]iOS video installation guide
Follow the videos below to download, install, and configure your eSIM on an iPhone.
eSIM installation guide
Installation method (install before departure)
We recommend installing your eSIM before departure, because installation requires a stable internet connection .This helps avoid installation problems when connectivity is limited abroad.
Installation option 1
Press and hold the eSIM QR code
This method is available on iOS 17.4 or later. Jeko sends the eSIM installation and activation details for your order to your email address. Press and hold the eSIM QR code in the email, then select Add eSIM when prompted.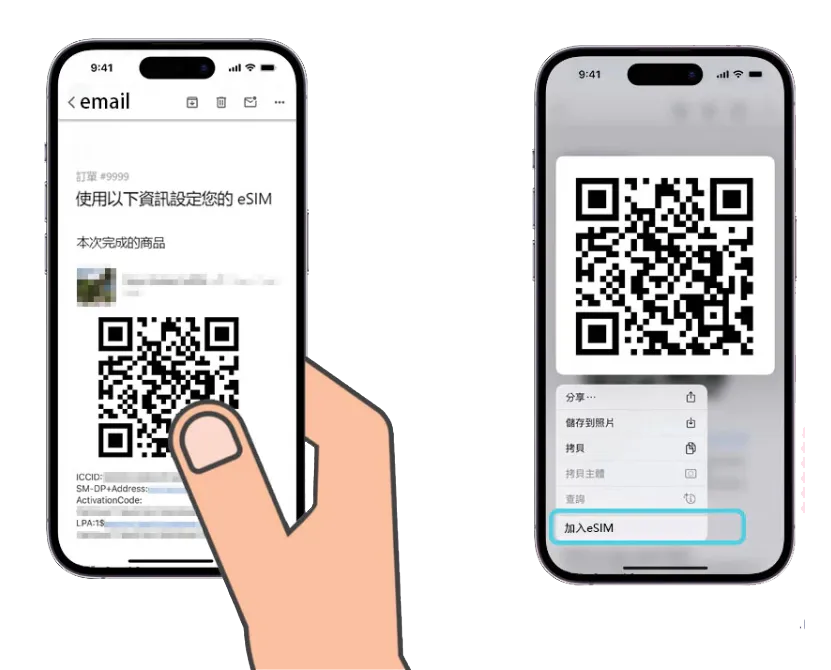
eSIM installation guide
Three ways to install an eSIM (install before departure)
Install your eSIM before departure while you have a stable internet connection.This helps avoid installation problems when connectivity is limited abroad.
Installation option 1
Scan the QR code with the iPhone camera
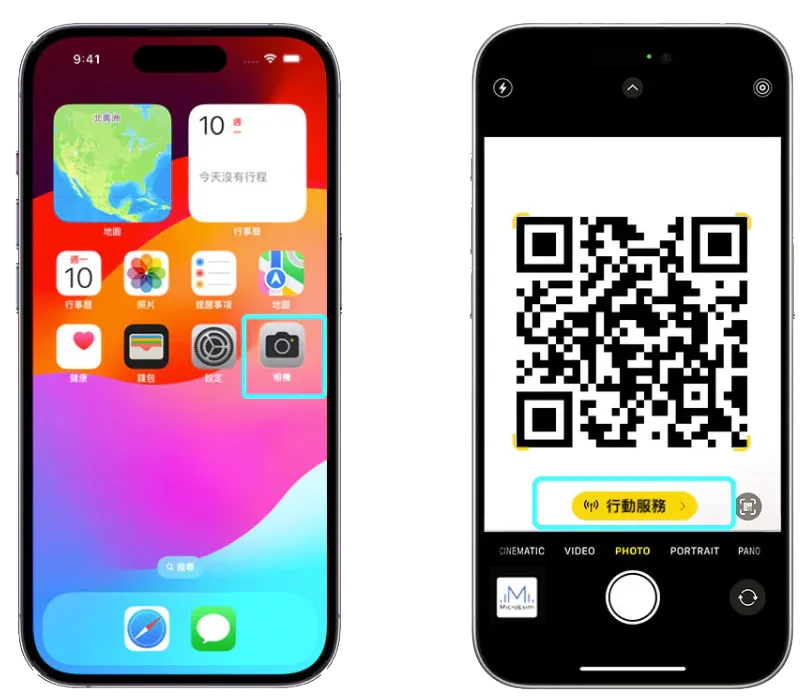
Installation option 1
Install directly with a long press
1. Open Settings
Select Settings → Cellular or Mobile Service → Add Cellular Plan or Add eSIM → Use QR Code.
2. Scan the QR code
Use your phone’s camera to scan the eSIM QR code received by email.
Installation option 2
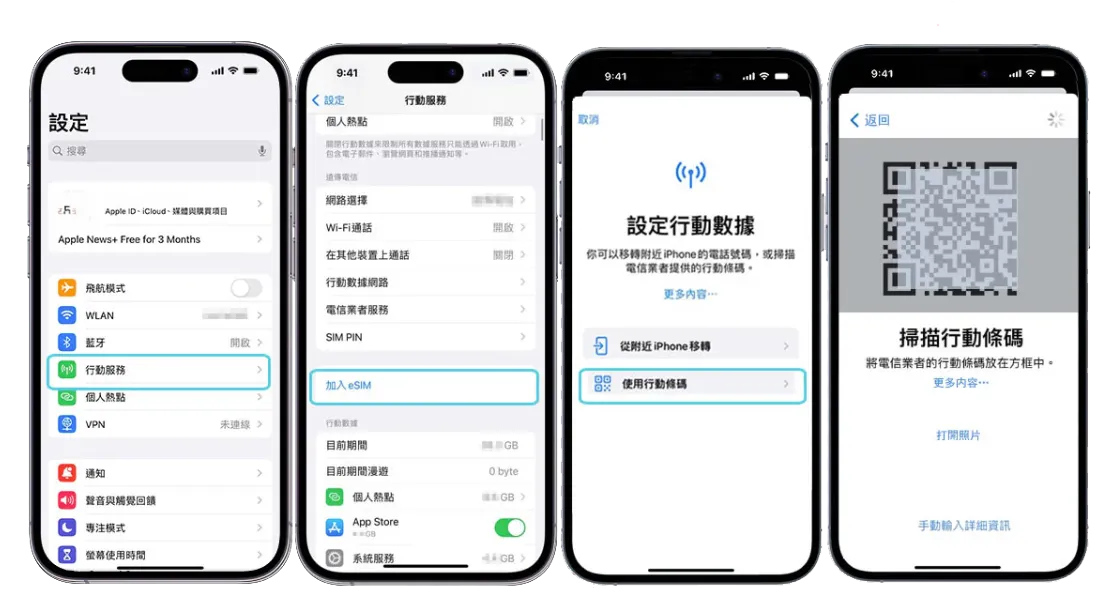
Scan from iPhone Settings
1. Open Settings
Select Settings → Cellular or Mobile Service → Add Cellular Plan or Add eSIM → Use QR Code.
2. Scan the QR code
Use your phone’s camera to scan the eSIM QR code received by email.
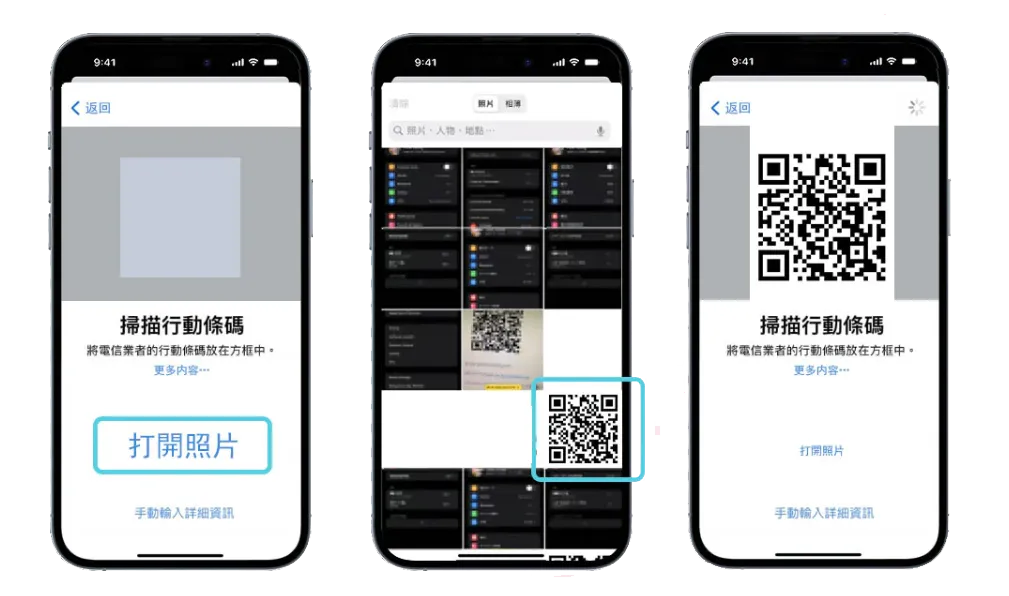
Installation option 3
Add an eSIM from the Photos app
1. Open Settings
Select Settings → Cellular or Mobile Service → Add Cellular Plan or Add eSIM → Use QR Code → Open Photos.
2. Select the eSIM QR code
Choose the image containing your eSIM QR code from the photo library. Your iPhone will scan the code and install the eSIM.